Camera Research
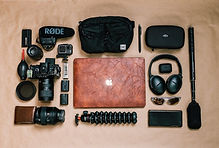
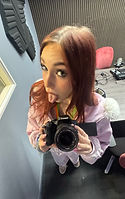
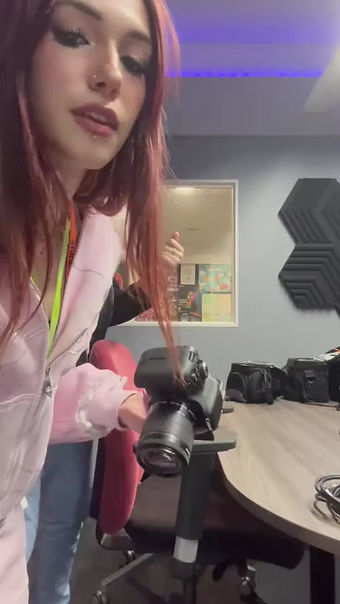
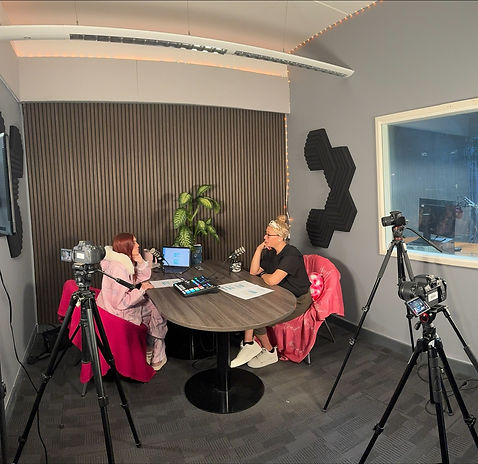
I started my research into cameras by looking up on a website How to Set Up Your Camera When Filming a Podcast - Auddy this then told me how I can set up cameras for a podcast. The first thing that the website spoke about was equipment. they noted using "DSLR, Canon, Sony or Nikon". In college we have access to Canon cameras. This is a photo of their camera set up.
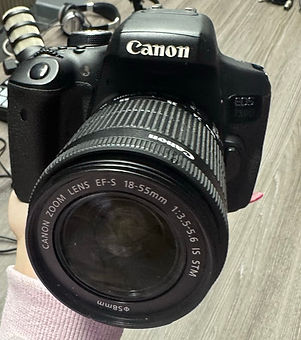
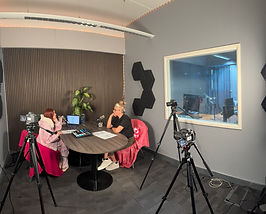
The next point is they want to make it ideal that location is important. As I'm in college I can only get limited location drops, this is why I have chosen the Radio studio 1 which has a wooden board background. The reason I will make my work stand out will be the rest of the set-up. I used the canon camera EOS 750D.
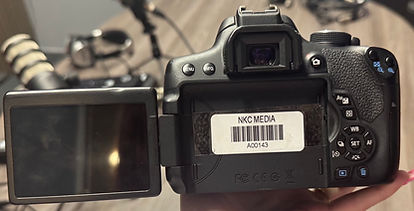
I used the website Buttons On A Camera: How To Get To Know Your Canon Camera. and Canon EOS 750D Instruction Manual (Page 27 of 416) | ManualsLib. To help with my understanding of the cameras. I also used the photo 483517.image0.jpg (314×400) for more understanding and backup.
3
4
5
.jpeg)
15
1
.jpeg)
2
6
7
8
9
14
13
10
11
12
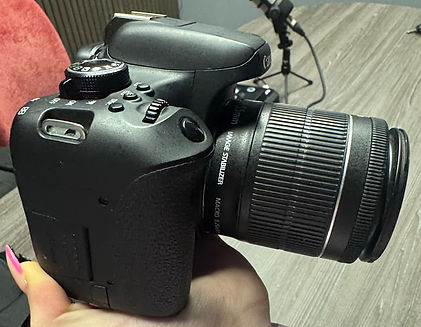
1.) Menu button
2.) Information button
3.) Live view/ movie button (I used this button to record the video)
4.) AE lock/FE lock/ Index/Reduce button
5.) AF point selection/ magnify button
6.) Aperture exposure compensations button
7.) quick control button
8.) White balance selection button
9.) AF operation selection button
10.) picture Style selection button
11.) Setting button
12.) Drive mode selection button
13.) erase/ delete button
14.) playback button
15.) card access lamp
.jpeg)
.jpeg)
1
2
3
4
5
6
7
8
9
10
11
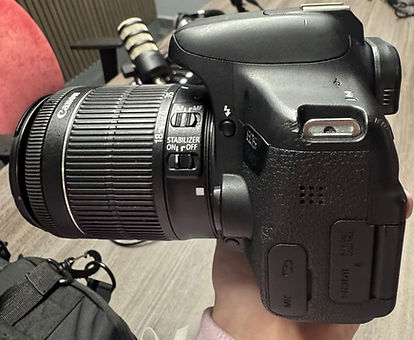
1.) Flash sync contacts
2.) Focal plane mark
3.) WIFI lamp
4.) Strap mount
5.) Speaker
6.) HDMI mini OUT terminal
7.) Terminal cover
8.) Flash button
9.) Zoom ring
10.) Image Stabilizer switch
11.) Focus mode switch
12.) Mode dial (P= program AE= Shutter-priority AE, TV= Aperture-priority AE, AV= Aperture-priority AE, M= Manual exposure) The other buttons are on this dial:
Scene Intelligent Auto, Flash Off, Creative Auto, Portrait, Landscape, Close-up, Sports, Special scene, Kids, Food, Candlelight, Night Portrait, Handheld Night Scene, HDR Backlight Control
2
3
4
5
7
6
8
9
11
10
.jpeg)
12
13
14
15
16
1
1.) shutter button
2.) main dial
3.) display button
4.) ISO speed setting button
5.) AF area selection button
6.) Red-eye reduction/ Self-timer lamp
7.) Flash sync contacts
8.) hot shoe
9.) Focal plane mark
10.) Strap mount
11.) microphone's
12.) speaker
13.) Terminal cover
14.) Depth-of-field preview button
15.) Lens release button
16.) Red-eye reduction/ Self-timer lamp
.jpeg)
12
I decided to take photos of the cameras and write about what each button does. I did this because I wanted to fully understand how to use the camera. By understanding all the buttons means I will understand ahead of time what I need to do. Understanding this will also help me if I get stuck or something messes up along the way. Before I started my recording I looked over the manual Menu Operations - Canon EOS 750D Instruction Manual ManualsLib to help me understand everything and how to film. I also used lots of videos from YouTube to show me someone else using and recording on the camera. My goal by doing this is to get as much understanding of how to use this camera so that I’m comfortable when filming.
I used the YouTube video Bing Videos To help me understand what to do with all these buttons and how they work. This also helped me understand how to change the settings, different modes and how to record. These sites both helped with my understanding of what to do and now I've watched and read over these I’m much more confident. My project and audience will benefit from this because I will now produce a podcast with great camera techniques and know what I’m doing. This will pay off into my production because my audience will see how technological the podcast is.
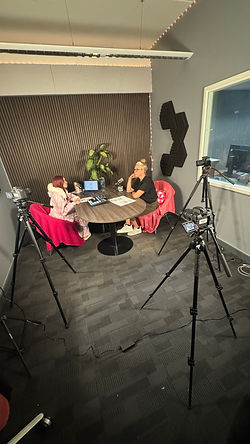
As you can see I decided to film little vlogs inside the studio. I did this to help with my research and to show the examiner what I did to get to my filming point and why.
Firstly I started off by showing the camera and noting what camera I used (college number not camera number). I explained that I will be using three different cameras and making sure they're all recording. After talking about the cameras, I next spoke about the room setup design. I showed what the room looked like and described how I wanted the table to face the other way being face on towards the camera. I explained that I wanted this so my guest and I can face each other and also have the wall in the background as one of the podcasters I researched on also used that type of backdrop. This was highly important as I wanted my podcast to be as alike the podcasts I did as possible, this is because I want to be able to highlight and show where I got my inspiration from and what videos/ information I gained to use for my own. Overall my audience and project will learn from this because I am stating how I want everything and each step of how I achieved this.
The videos I did also helped me to stay on track with everything I did; what I mean by this is because I have different mini vlogs I am not only telling the audience what I'm doing, but I'm also using it as a plan to remind myself what I did and what to talk about. This way my project can have as much detailed analysis of what I did as possible.
Special Thank you
My producer and helper in this project was Lorca, Lorca helped me make sure all my cameras were still rolling and not turning off mid-way through. She also helped me set up my equipment and rooms. Lorca was there throughout the whole filming and stayed an extra 2 1/2 hours more than college set times to make sure everything was going well. I thank her a lot and truly don't think I could've done it without her. My project benefits from this because I wouldn't have been able to record this whole podcast by myself and I also would have a hard time setting up the production room. This would make my podcast less than what I was hoping for; luckily with Lorca's help, the room was exactly like how I envisioned it to be; this makes my podcast stand out and be the best of what it could be.
Camera Angles Research
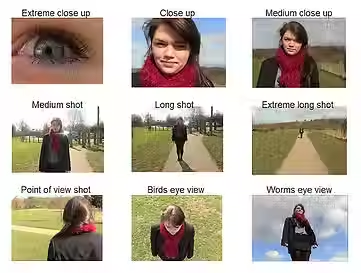
These are the different camera angles I will be thinking of. This image is from https://www.google.com/url?sa=i&url=https%3A%2F%2Fwww.walkingstickpresentations.com%2Fsingle-post%2F2015%2F07%2F15%2F5-camera-angles-and-positions-for-your-next-shoot&psig=AOvVaw1sFQw3GqL5sQHKLB0WYC6f&ust=1745923019290000&source=images&cd=vfe&opi=89978449&ved=0CBkQjhxqFwoTCOi0rJzE-owDFQAAAAAdAAAAABAE
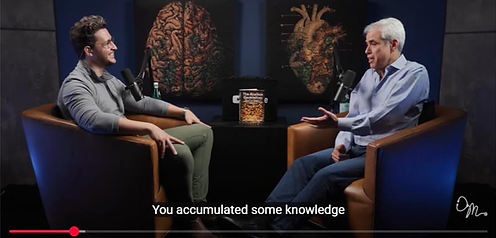
I used this image to help me with my understanding of camera angles. We used this template in the first year. For my camera angles I wanted to look at some podcasters camera angles they used. I looked at the podcast Dr. Jonathan Haidt: How Smartphones & Social Media Impact Mental Health & the Realistic Solutions
To determine what types of setup camera I want to include in mine.
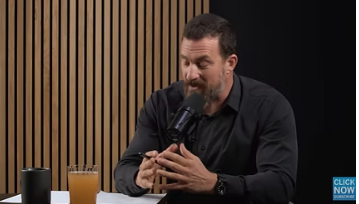
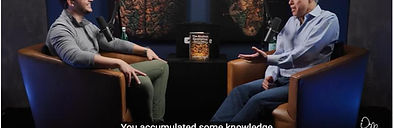
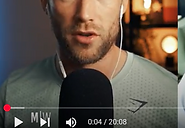
This podcast is the main one that gave me ideas, you can see that wooden board in the background that I had in the studio I was using. He uses a medium close up shot but a little further back so you can still see the table, cup and his arms. I believe he did this to give a wider effect on the audience, because too close up would make the audience feel belittled or quite intimated. On the other hand if it were too far away, the audience may become distracted by what he's saying. This is because a medium/long shot is hard to connect with serious moods, emotions and the emphasis in the podcaster voice. I wanted to do the same that Andrew the host did.

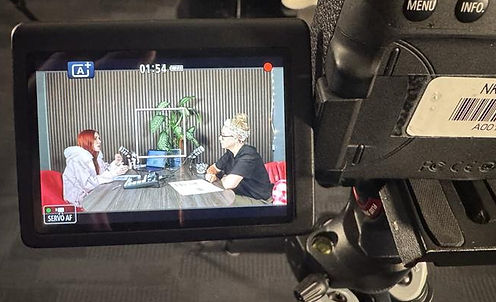.jpeg)
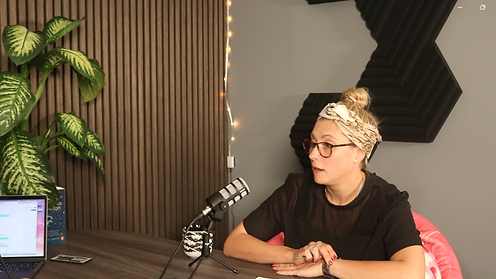
This is my shot. I had the camera slightly further back than I originally planned; because I wanted the plant, mug and laptop in the back. I wanted these in the back because In the podcast Understand Your Brain & Master Your Life - Andrew Huberman (4K). The host Chris, had his laptop in the shot with more of a surrounding. I liked this idea and wanted to emerge the two.
In my shot I have a medium close up but slightly further away- not faraway enough to be a medium shot though. My microphone is visible along with the computer, mug, and the background. I probably could have moved the camera slightly closer next time. Therefore the skills and weaknesses I learnt from this will be to remember to double check how I like everything and print out the other podcasts inspiration, so I can have them side-by-side. Next project I do I will definitely make sure to remember this. The skills I learnt is that I can understand about camera angles and shot types to produce a piece of media. I was slightly nearer the wall than my host as well so it created the look that I was further away, and for this shot of both of us, I could have brought it in closer as it is still a little further back. For next time I will make sure I'm happy with the shot and because I planned everything before the guest arrived, I couldn't get the feel of how the video will look when we're both together. Because we started a lot later on in the day I felt a little rushed to get started that I didn't think about the little details. In my next production, I will make sure I take time thinking about the set up, and invite my guest in earlier so we can both be happy and comfortable with the setting and cameras. The last camera shot I did was a medium close up of my guest. This shot is the one I'm happiest with, I think the closeness is perfect, you can see the mug, plant, computer and the book "the anxious generation" by Jonathan Haidt, which was a big part of my research therefore I felt the need to include this. Other podcasts I looked at did the same. My guest is at the right distance from the camera and has the background and lights perfectly. I'm very happy with the outcome of this shot and I feel this project has taught me a lot of new weaknesses/ targets for me to improve on next time. I will think more about the camera set up, printing out pictures of ideas and holding that to my camera/ set up. This way I can be 100% on what I want and my audience will benefit from this with a piece of media that is well thought through and laid out beautifully. This podcast has the book in the shot that I wanted for mine; although I wanted my shot a lot closer. I didn't like this camera shot because it's a medium/long shot and I think as the audience, it breaks away from the serious conversation and makes you look around or put your focus on something other than the information. Therefore I don't want my audience feeling this way so I'll stick with the medium close up shot.

Finding My Guest
For my guest I wanted a Practitioner. This is because I want someone who knows about mental health and is approved to speak about it. The reason why I chose a DBT therapist, is because I went through DBT and DBT is an intense therapy stands for (Dialectical Behaviour Therapy). This therapy is for individuals who suffer with intense emotions, need to develop healthier coping skills, and improve relationships. DBT is particularly used when someone struggles with emotional dysregulation, including people with borderline personality disorder, but it can also be beneficial for other mental health condition. I was diagnosed through DBT and this therapy changed my life. I was lucky to go through this year long course in order to be where am I now. DBT plays a big part in my life and the therapists I got the chance to work with were helpful. I know they take pride in their work and they are familiar with adolescence and the common issues. So to follow up on why I wanted someone from the DBT team to do my podcast is entirely based off my experience and relationship with them; and also their knowledge for helping younger kids.
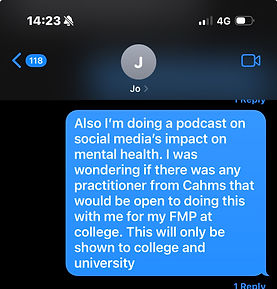
I started off by messaging my old Family therapist, I asked her if there were any therapists willing to do my podcast with me. I was hoping that this would be a yes; but at the same time I could see why this would be difficult as it can go against their guidelines.
_edited.jpg)
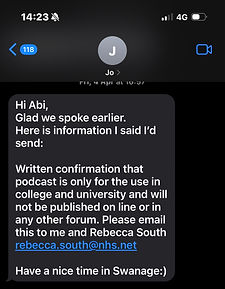
I received a response around a week later. At this point I was shocked because I thought she had blocked me. (when you end DBT the therapists are supposed to block you because of confidential reasons). I found out she didn't block me by receiving a phone call from here. I was in the station at this point so I couldn't record it. She told me how her manager agreed to letting someone do my podcast as long as I send an email explaining that this will only be shared privately to college or university. I copied the email she sent me and started typing out what I wanted to say.

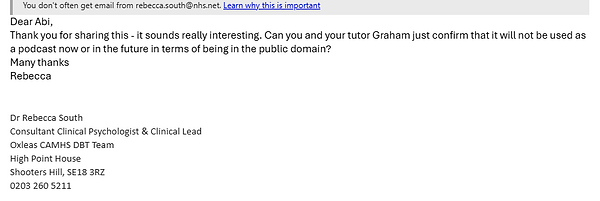
I then emailed the manager of DBT CAMHS services to see if she had anyone available to do my podcast. This is when I had to give evidence and approval of the fact this podcast will be private. This is because it can go against they're safety plan and could initiate problems. I got a response by a bot with an alternated message that said she wouldn't be back until the 22nd of April.
When the 22nd came around, I got a reply stating that she wanted another set of evidence by asking my tutor.
I then got my tutor Grahame send send over confirmation on this and the idea of it being private.

_edited.jpg)
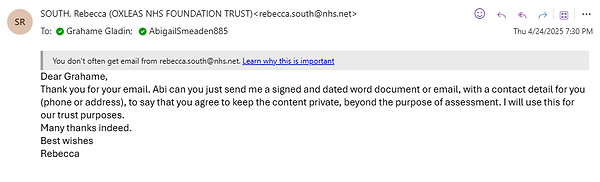
After that she replied with an email stating the idea that I need to create a word document stating that I consent to not letting the podcast go anywhere other than private college work. She wanted me to make a word document including my confidential and my phone number and email with my name.
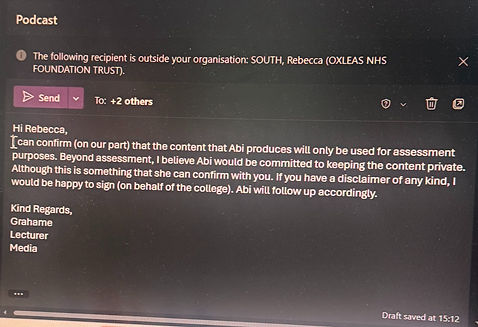
This is the email that Grahame sent to the Manager to announce on his behalf he wont let the video get published anywhere else but for college grading evidence.
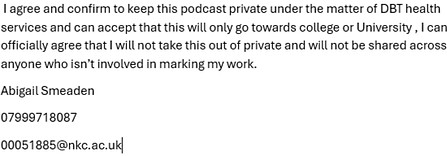
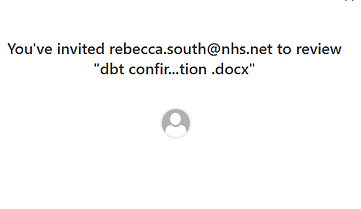
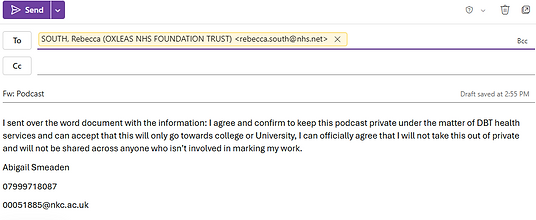
This is my word document of my confirmation. At first I was confused and didn't really know what to say or how to say it, I then winged it how I thought most people would do it. I was going to ask for help but I thought I would try do it for myself so I can learn in future. I sent the link to my word document to Rebecca and made it so she can review it. I also copied and pasted the word doc into email and sent it to her that way in case it didn't work.
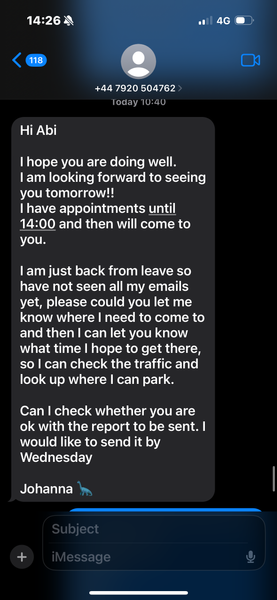
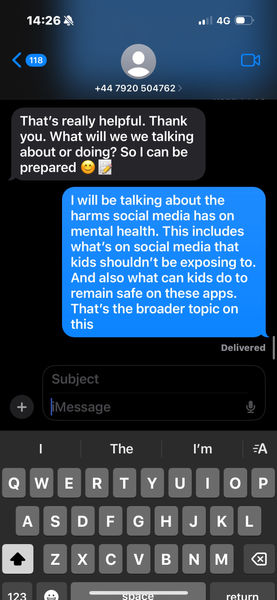
This is when my therapist told me she would be open to filming with me. This made me extremely happy as Johanna is the one person that helped me and our conversations flow so easily. I feel that now she's doing my podcast I've got an advantage of achieving the type of product I want too. Understanding what the topic is on we both bounce off each other well; also because we've had a bond before its more enjoyable for the audience to watch as it will feel more natural. Johanna worked in the NHS for children, before she came to DBT so she has a lot of experience with young kids which is crucial for my work. Hopefully because of this my audience will get a good quality video made with lots of important factors and a good level understanding base of knowledge.
This is my conversation with Johanna about what it'll be about and what kind of notes she will make before the podcast. As I will mostly be giving questions and facts, Johanna is the main talker. This is because in my other podcasts the host spoke less. So making sure Johanna knows what she's talking about is important.
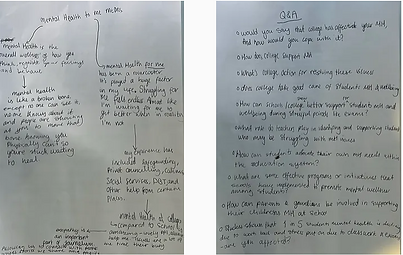
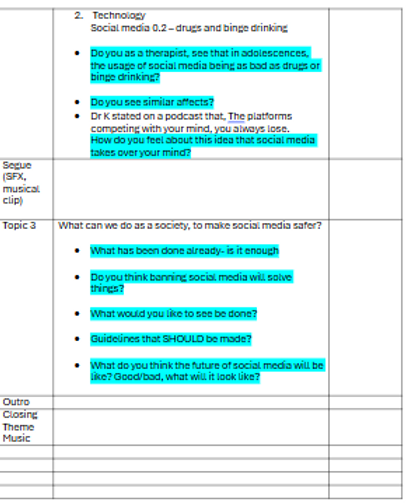
Podcast - script - draft
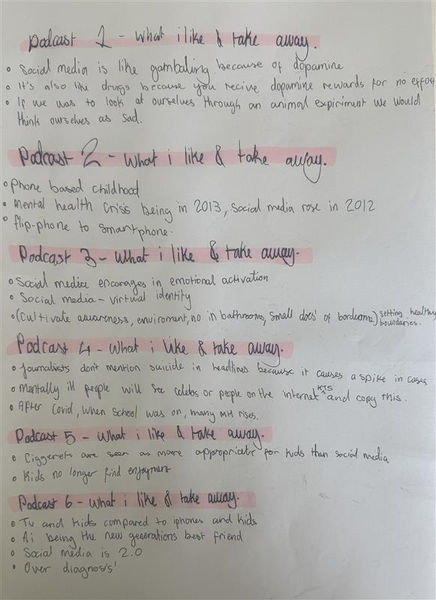
The first thing I did was note down all the things I liked from the podcasts I looked at. This will help me understand what I liked and what I want to be featured in my podcast. This will also help me to think of topic questions I want to include. I thought that starting here is the most beneficial way of reminding myself what I definitely want to mention. Now I have to think of questions around this that will benefit my podcast. I then asked my tutor Dan with help on how I should format questions. He sent me a word doc of a script/podcast template. I started off wanting to dive my podcast in with a serious mind-blowing topic starter. I worked on choosing different words and sentencing with my classmate and tutor Dan. After lots of thought I came to the conclusion that "social media is the most destructed drug", when I got home I was finishing off my script and reading through to make sure the flow was okay; I realised that I didn't like this starter so I changed to sentence to "Is social media the most addictive drug?" I chose this sentence as my audience will question themselves as well as be shocked and confused about what I mean. Another reason why this is good is because it tells the audience a bit about the project/podcast, before they even realise.
Before
After
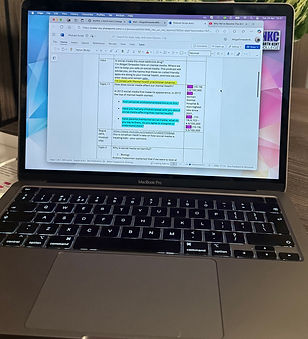
A lot of my weakness' to do with my production was about my lack of script writing. In my first project of podcasting, I wrote out a whole script for my guest and I (big mistake), I was too anxious about trying to think of a conversation at the top of my head. I was told it sounded like I was reading and I had to change this. My next project was to do a live radio show; this time I had things to say but not a script. Although I did read though the lines I wrote and was worried it would sound the same as last time. In the last podcast I did I wrote down a structure of the podcast and two pieces of paper, one explaining different quotes I read, or certain sentences I wanted to talk about. The other piece of paper had Q$A questions on it that I was going to ask the guest. Overall that podcast was good, I just could've structured the script better. This project I had help from my tutor to create a word documented script that was a lot easier to follow by, had less writing but also a lot more information that tied from the podcasts I researched about. This project I wanted to develop my research into my podcast as I didn't do that in my previous projects. This project I really wanted to portray how I got my information and express my skills that I've developed of research. I noted down everything that I took inspiration from to produce my podcast to have as much information as theirs do. Overall I think my script was good and the best take I've made at scripts. I could definitely add more to it; When I get my targets back from this project I will see if connecting my podcasts with the other podcasts making my whole project based on that was the best thing to do, or if before when I would use my own opinions not so much what I researched about was better.
This here is my scripts from my previous podcast. I wrote down my structure on my website and had these hand written scripts. I hate trying to read handwriting so this was an issue for me. Thankfully I had my new script on a document so I could read the typed message rather than trying to figure out what a word says.
Overall I think I learnt skills and weakness in script writing; because I improved from last time giving myself new strengths of being able to correlate research into project/script, I also learnt the strengths to structure out my podcast into sections so its easier to keep at a paste of where I want to be. I think for my targets in future I will try to write a bit on time and how long I want to take. I will also do practice runs as I couldn't. With my guests previously I did practice runs to get an idea of how it will go. This time I couldn't do that as we were rushing. I will give myself more time in future and go through everything to see how I like it. And to see if there needs to be any changes.
I've learnt lots of new skills this project but I've also learnt lots of learning curves and areas to improve on.
Overall I think my audience will be satisfied by my project and my audience will understand how I got my information and why it's beneficial.
Even though I've had lots of area's to improve I feel as though I have gained strengths and was able to produce a project that is satisfactory and thought through. My audience will understand the knowledge I have on this situation and therofre they will carry on to remain safe among social media to protect their mental health. There was lots of things during this project I wanted my aim to be but I feel as though I maybe haven't shown full confidential of what my aim is. Therefore in my next project I will make sure to pick one 'title' or aim that i want my project to be about. And I will do all resaerch and production to answer or achieve that aim. I lacked at doing this in this project but I have given myself lots of targets to improve on next time.
This is my word document on the laptop I was using during the production. I had the document on the laptop and on paper, because I prefer to read off of paper as I find it easier and less noticeable, whereas with the laptop sometimes it can seem off putting and distracting for the audience. With the laptop, the screen kept going dark every few minuets as I wasn't using it. This was distracting for me as I had to keep moving the touchpad with my finger so it doesn't fully shut off. If it fully shut off it will break off the podcast by taking too much time typing my password and username back in. Therefore it is very distracting and I feel it doesn't do much help. Aside from this I had to use the laptop. This is because I wanted to show my guest a video and to do that I needed the laptop open on the right time and the right link. This went well as I was able to show my guest the video. Unfortunately the sound was a little quiet so we had to stop and replay it which caused a little muddle-up. We quickly got back to where we were and resolved this issue. Overall I defiantly need to check the volume in future if I do this again. But I think my script and laptop clip was all okay and I hope in future references I remember to double check all these little details.
.jpeg)
Room Set-up design
.jpeg)
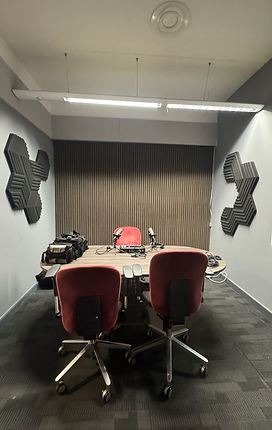
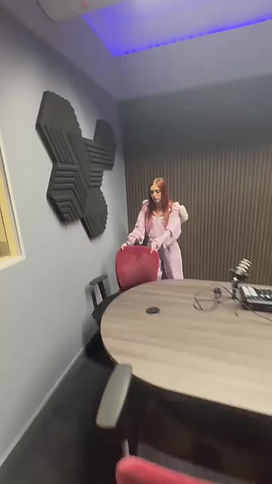
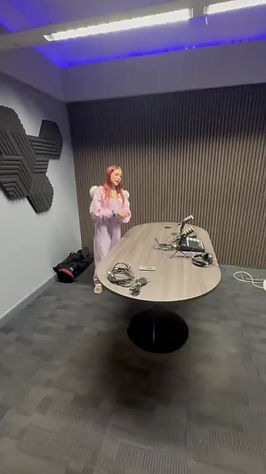
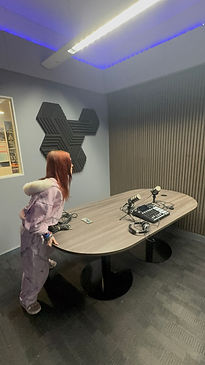
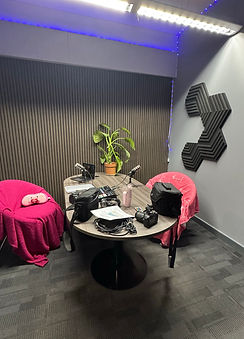
This is how my room started. The wooden board in the background is a great wall piece for my project as other podcasters have done the same. There were these black foam pads to keep out the echo and make the sound in the room more sharp and consistent. There was also LED lights fitted around the wooden backdrop. These lights were off in this photo but I'll show you what we did with them afterwards. When you first walk into the studio it feels very office like. the table was planted right in the middle of the room. I knew I wanted to move the table. The microphones were already placed on the table so I don't need to touch them or sort them out. Another thing about the room before we did anything was the chairs. I didn't want these being in my podcast so we removed them from the scene. Overall this room was a great space and had many great features; my favourite things about the room are, the space is perfect to film podcasts in, not too big and not too compact and small. Another thing I loved about the room is that backdrop, it complements the room and my podcast so well. I'm very pleased that the podcast I researched on also included the same background, which personally ties my project together. There were parts I loved about the room, but also parts I didn't, this includes of the chairs, but thankfully I worked around this and got new chairs. The other thing I hated about this room was the windows. You can't see them in this picture, but in the room there are two massive windows that look out into the corridor on the left, and the other podcast room on the right. This is a great way to let in light and it's hard to hear through as the glass is bulletproof; but I wish there were curtains or blinds to cut off from the outside. This is because when my peers went to break, or went home it could become very distracting for my guest and I. I was going to bring something to cover it up, but I couldn't find anything at home that would work. If I was to work in here again I would try to solve this issue a few days before so I can be prepared. For this project, to face around the issue I decided to face my guest on the left-hand side so I wouldn't want to look outside; my guest unfortunately did but I'd rather focus on myself not getting distracted and to stay focused.
.jpeg)
This video is where I move the table to where I want it. The reason why I decided to film is because I want to show the audience how I moved it and by doing a mini vlog I can showcase why I moved it there and how I moved it. The first step I did was moving the chairs. I had to move every chair away from the table so there wasn't a massive mess. Filming this did also help remind me about spatial awareness. Usually I would place everything into a pile and then sort it out from there, but as I was recording I didn't want loads of furniture or equipment lying around as this would look tacky. So by trying to keep the filming area clean I also found this helped me sort everything out easier. This is a new strength and skill I learnt in this project and if my tutors agree on this idea I will continue to do this in future projects. After I moved the chair to the right place, I got started on moving the table. Before I started recording I did move the table around to make sure of two things; one, it wasn't really heavy that I couldn't move it, and two, that the table turned to the right point and didn't damage anything by being too close. After checking these I realised that the table was very light and easy to move. I also found it was quite easy to position the table to where I wanted it to go. After looking at the table when it was moved I realised how smoothly it ended with the background. I was very happy with the outcome. My audience can achieve a lot from this because my background fits nicely so the podcasts visual will be pleasing to my audience, making them comfort and safe urging them to watch more. Another aspect of my project this will help is my planning, because my research plan was thought about when thinking of setting, I had a range of different ideas I wanted to think about. Personally I feel my research ties in well with the set up and I'm pleased with the outcome. This is a photo that was taking as I was moving the table. Here you can see one of the windows I was talking about, and the LED lights which were set to blue at this point.
In the next vlog I will be moving the microphones and speaking more on the window and my next steps.
In this next video I mentioned how I wanted to move around the microphones. I stated that I didn't want the microphones near the camera because I didn't want to break off the connection between what's being said by the person and the camera. If the mics were near the camera the audience may get distracted by it or it could make the video become unfocused. There are lots of other reasons too, like it could block the speakers mouth or face, it could get knocked where it would be more visible on that side. I mentioned in the video about it being in the way. In the next part of the video I was crouching down to test how the mics would look and feel if I was sitting down. This was helpful to my project because I got a feel of how it would look and be like before I got the chairs. This is a good skill I learnt because I planned it ahead of time which is something I usually forget about doing. I next showed the camera the window and explained that I will be sitting on the left side facing my back to the window so I don't get distracted.
This was crucial to speak about as I have a reason to do everything. Therefore sharing the reason will make the audience understand where I got my ideas to face a certain way. After that I moved the audio recorder to face the way I'm facing. I did this because it would look weird being on the guests side and look weird if it's facing the wall or camera. Because it looks best in front of me I chose that spot so I can be more professional and it will look more suitable. After that I spoke about the next steps which would include the new chairs, blankets and pillows. These are to brighten up the place and add a bit of colour and life into the studio. After I placed the laptop and papers down on the table with my cup you can see how I placed the table and the final touches. This also highlights the importance of planning where everything goes as if my equipment was in a different space it could cause a bad effect on my work making it look odd or not quite right.
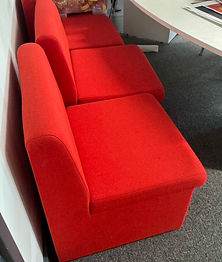
The next video I did was about getting the chairs from the TV studio room one and move it to the radio studio where we're filming. I used these black oval chairs that I thought were perfect as they have a slight lifted arm without being completely square armchair. I asked a lecturer David to help me get the chairs from the room as there were people doing their production in the room, that's why I couldn't get the chairs myself. On the video I pointed to where I got the chairs from but didn't want to film from that room; so we placed the chairs down the corridor and picked them up placing them in the room where I needed them to go. We placed the chairs opposite each other making it look more like a conversation room. One of my tutors jessie announced the idea that I should use these red chairs instead. I said no because I didn't like the way it had no arms. I think this chair would look awkward from the side as you can see the host and guests whole body rather than with the other chairs it hides the person away a bit. I also think the black chairs look a lot more comfortable.
After placing the chairs where I want them to be, I grabbed both blankets that I brought from home and placed them over the top. I wanted the blankets to be pink as that's my favirout colour; this also brings in a little bit of me to my project making my production more unique. I used the pillows I had at home. I used one which was a pink gaming controller, I chose this because social media ties into online gaming and therefore this was the perfect pillow I had. The second pillow I used was a bear with hearts. This one was chosen because the hearts reminded me of social media like buttons so I thought it fitted with the scene a little. Overall I was happy with the outcome and thought my setup was slowly getting to the end point.
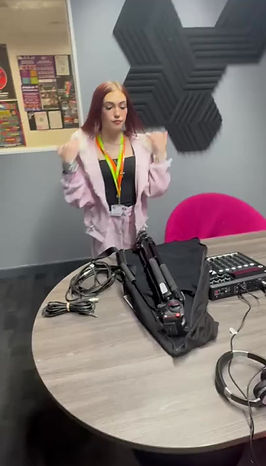
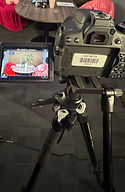
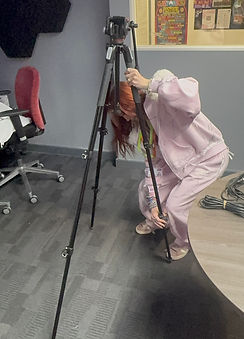
The next step I did was set up the tripods, There were 3 different tripods and because I hadn't set one up previously it took me a few tries. Every try I did I slowly worked out how they worked which led me to film my video of setting it up. Because I was unsure on how to set it up, I struggled at using the right terminology and talking through each steps. For future projects I will do some research into the different tripods and the right terminology and set up.
I started off by unclipping all the clips to increase the hight of the tripod. When I did that I clipped the clips back around again making the legs secure and stable. To reduce the hight and find the right hight I wanted, I slowly unclipped the bottom three clips on each leg; pushing the leg back up and clipping the clips back down when I chose the right hight. I think I could've checked the hight a little more and double checked over everything but the tripods seemed to be at a good length. I then positioned my tripods where I wanted them, this was about a meter away from the table/ chairs. This photo is a photo on me adjusting the length of the tripod to where I want them to
be. I know the end of the video cut out a little bit at the end so I couldn't show the end result but in this
photo here you can see how the end of the tripod looked. I didn't have it too high as I was sitting down
and the fact I'm short. I also didn't want the camera facing down on me as that would look intimidating
and as if the audience is above me. Because the topic I'm talking about is serious I want the audience to
understand I'm on the same level as them and the thoughts and information being shared are the same
understanding level of having a conversation rather than being like a teacher looking down, or looking
up. This will make my audience feel belittled and that's the opposite of howe my project is being
portrayed as.
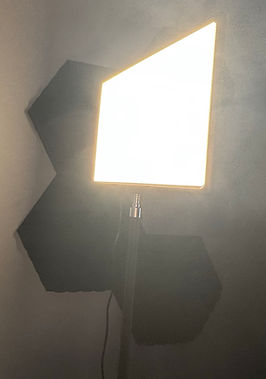
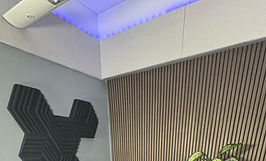
The next steps I did to prepare my room was to figure out the lights. There was a main light in the room that I was thinking of using because it lit up the room really nicely and I thought it would look great. After speaking with my tutors about lighting they reminded me that I would look washed out on camera if I chose to keep that main light on. I soon realised what they meant and looked at the stand-up spotlights. These lights have multiple different settings between a white light to an orange light. Lots of the podcasts I watched used a slight yellow light tint in their podcast, I thought this would be the best idea. I set the lights to go the most orange they can. By doing this it gives a homier comfort feel to the room. It feels less intimidating and will make my audience feel more safe and comfortable.
These podcasts used lighting, the first one uses a blue spotlight with a yellow amber main light, this projects the idea that they wanted a spotlight but not white because this would make the podcasters very bright and washed out. It would also look like they're outside speaking about something bright and cheery, this isn't the case, so they chose that yellow home light with the spotlights to put a light on what's being said but not bright enough to see the whole production. The second podcast uses that amber light in the back; this makes you as the audience feel like you're in a home, with comfort lights. This also gives a cosy feeling towards the audience making them feel safer and more understanding. Because these topics are so serious and could make the audience feel uncomfortable, understanding that the lights will make them feel comfort, peace and safety; breaks off the serious topic and makes the audience believe the speaker more because they trust what they say due to the safety surrounding. The last podcast also does the same with the amber background so it makes the audience trust that person. This is what I'm trying to achieve with my podcast. The photo of the light I chose is what the light is like from the hosts seat. I did this so I can show where it faces me and how it looks from my side. Personally I would prefer the lights to go more orange but they didn't; to prevent this in future I will get an orange light cover and see if that gives off a better effect.
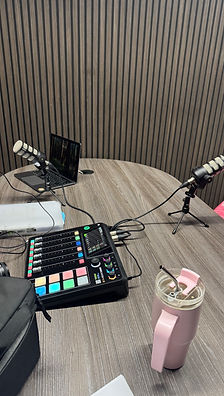
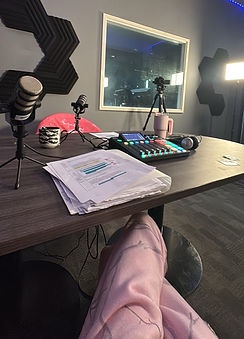
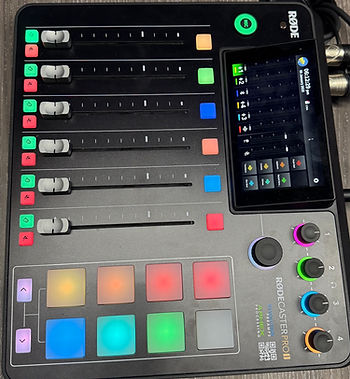
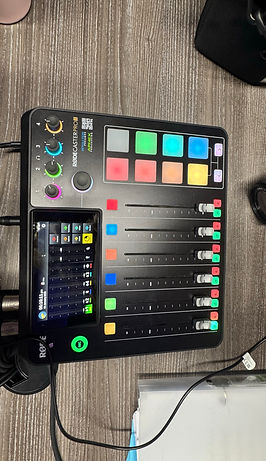
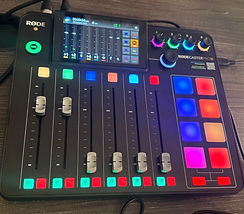
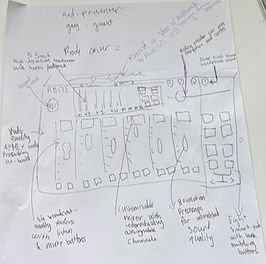
This photo here is the mixing board, I didn't research on this or know any information on how it works. I will speak with jessie about this radio caster and what the full name is, therefore I can look at the manual and explain in detail what each key means. Unfortunately, I thought I pressed record but the button didn't go red, it stayed green so therefore I will learn more on it to stop this mistake happen again in future. My tutor jessie told me that this piece of equipment was called Rode caster 2. I looked this up on google asking what the manual is. I used the website 877691-01U.pdf. To determine what each part of the recorder means. I started to draw the Rode caster 2 and then linked all of that information off of it so I can write it in my work.
1.) Is the record button which I need to remember in future and the colours it goes. Green means not
recording, red means record, yellow is when its paused. In future I will double, triple check that the
button is RED when I start recording.
2.) Is a 5.5 inch high-definition touchscreen with haptic feedback.
3.) This is a studio quality APHEX audio processing on-board.
4.) These are six broadcast quality faders with listen and mute buttons.
5.) These are customisable mixers with individually assignable channels.
6.) These are revolution preamps for unmatched sound quality, you can change the tempo/ loud-
quietness of every persons microphone; this means when one person is speaking, you can turn the
other persons mic all the way down so there's only sound from one person.
7.) These are eight smart pads with bank switching buttons. You can also customise the colours and
effects of each one.
8.) They're four high power headphone output.
9.) This rotary encoder for easy navigation and control.
10.) The last one is a record in stereo of multitrack to microSD, USB storage device computer.
Whit my audio, because the record didn't work; I set myself some targets for the future. Firstly, I will educate myself on all the equipment. This I really regret doing because if I did learn about everything and learn the colours of recording, pause and stop. I would have noticed and understood that green was stop not go (record). When educating myself on these issues I'm less likely to forget or misunderstand what everything means.
The next thing I did was set up a plant. I thought some
greenery would look really nice with the production and
by adding a plant it makes the audience feel more homy
and alive. Because seeing something nature-like can give
the audience a little dopamine boost. I thought adding a
plant would tie the colours of the room together, fill up
any space and look really pleasing to my audience.
The LED lights were set to blue originally but after me
and my peers were looking at the different colour options.
After viewing the colours I thought red would look the
best but after looking at other colours, I really liked the
orange, I feel it matched the room theme and colours; as
well as looking similar to the spotlights we have. And it
also brought the room together; the orange reminds me
of some of the podcasts I looked at, and how they
designed their setting. Overall the finished look is
something I was very pleased with. I felt the colours
blended together really well and the whole room
complemented each other. I feel as though the room really
came to life for this project. I have definitely gained skills
on room set up design, and also I feel this ties in with my
audience as they will look at my background feeling calm
and safe. This will help sooth over my audience making
them trust me and the things I've got to say.
.jpeg)
.jpeg)
.jpeg)
.jpeg)
.jpeg)
.jpeg)
.jpeg)
.jpeg)
.jpeg)
.jpeg)
.jpeg)
.jpeg)
.jpeg)
.jpeg)
2
3
5
7
10
9
8
6
4
1
_edited.jpg)
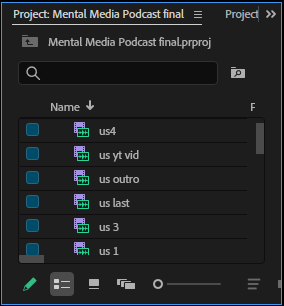
Editing
.jpeg)
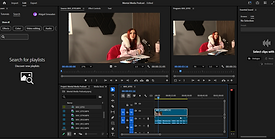
I started off by taking a photo of Jessies laptop. What happened here? Well when I first started recording, I forgot to press the record button on the Rode Caster (audio recorder) so when it came to the end I realised I never pressed record, this took a toll on my performance and I was got really upset, thankfully I did my podcast with my therapist so she helped me calm down. Jessie told me that she could use an Ai editor to enhance the sound making the sound from the camera stand out as a mic. Unfortunately this didn't work so I was stuck with the camera audio. This photo here is when jessie used one clip and tried to enhance it. This was shambles but it taught me skills to remember to double check everything,
do a practice round before hand so I'm fully prepared and make sure I do
research on the equipment before I use it. This way in future I'll remember
what everything does, when its on and how to use it properly.
This part of my performance was a learning curve and I know what I have set
for myself for future projects.
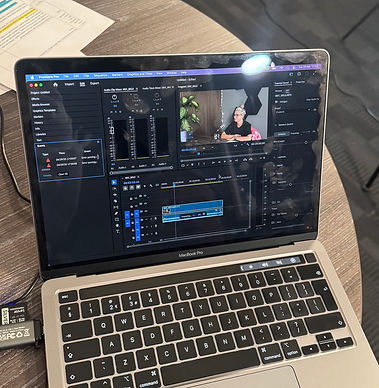
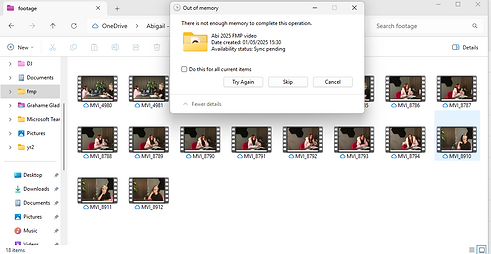
When I got my SD cards back I started uploading them from my laptop, I did
this because I wanted to be able to do my editing from home. By doing it on
my laptop means I have an advantage of changing anything I want whenever.
Unfortunately my laptop was too full with storage, so to get around this I had
to re-download it onto the computer; this took a very long time so I worked on
my coursework from my laptop while they were uploading to the computer.
This screenshot explains the issues that I couldn't download all the videos as I
had no storage throughout my laptop to complete the final slides. To get
through this when they were all uploaded to my desktop on the computer I
logged into premier pro. We use premier pro because it's the most professional
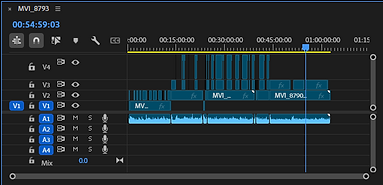
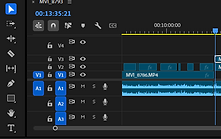
editing app for our products. I then dragged my videos from computer into
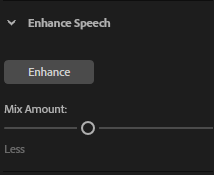
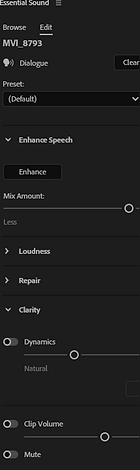
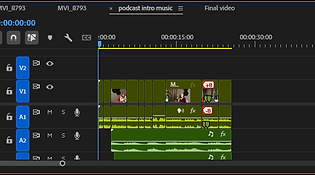
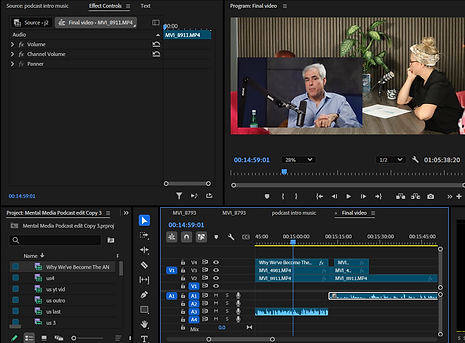
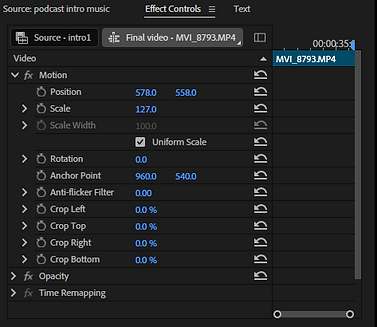
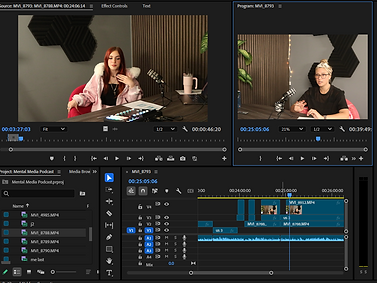
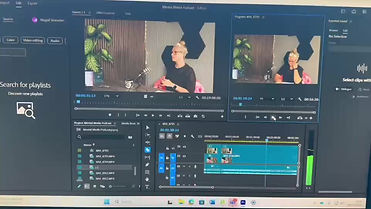
the premier pro media import section, while I was sorting out my videos, I labelled them. (Us, J and Me) I did this for the different camera angles because I wanted to plan out which videos to upload and when. By doing this I can understand what videos go with what and it's easier to figure out. My next steps were to put the videos one by one in order. Beacuse I didnt have sound due to the recording, I used one camera's sound for the whole production instead of using all three. My first clip was my intro, I edited that first by clipping out all the parts where I paused to look at my work. This became a little weird as there were lots of cut offs that were noticeable, Dan helped me by deciding to zoom in certain parts making the video look like it was taken from two different cameras, at first I liked this because I didn't want the fade, but the more I look at it I slowly begging to hate it. The hardest part of editing was making sure the voices match with the camera audio. To help me with this I started to do one video of my guest speaking and edit that, after I cut out where I would talk and where I want the 'both camera view' being, this is to plan out where to add the next videos. I put Johanna's shot at the top as that's the main focused one, me underneath that so when I cut out the parts of Johanna when I was speaking, the video will be on me. After that I added the shot of us both to the very bottom, under me, so when I want the shot being on us I can cut out the top two leaving the bottom as it is. To cut the sections, I filmed a video from my phone so that I can explain how I did it. I found the place where I started talking and made a cut with the sippet tool, by doing this it separates the videos, the next thing I did was to find where I stopped talking, where my guest comes back into talk, this is where I snip the end and use the arrow key on the side button to click on the part I want removed, (in between both cuts) and press delete from my keyboard; by doing this I deleted the part where my guest doesn't talk and my video comes up. The photo to the right is where I started, this is my intro and by doing this first I get a feel of how to edit the rest. This photo here is what the edit control panel looks after I made all my clips, you can see the amount of cutting I had to do throughout, you can also see the levels of where I put everything. I didn't cut any of the sound bar, the reason why there are gaps and cuts is because when I needed to use another part of the video (after the camera shuts off) I had to replace it with the continuing video that then came with a new sound from that camera, this is because I didn't have a recording from the microphone. Where the long gap of no top video is; I had lost a recording from the SD card, the video records into two parts but for some reason the first card never loaded. The camera facing Johanna on take 4, died, my producer Lorca got a new battery and we were rolling again, after 15 minutes the cameras record into two parts, somehow the first part after the new battery got wiped, there wasn't a way of not pressing record because the other half of the video was shot. To overcome this issue I used the shot of us both over the whole time. This was lucky that I had multiple shots but also annoying as I didn't want the camera being faced on two people for a long period of time. Because these mistakes happen often I was able to remain clam and edit around this understanding I will evaluate on this. When I finished editing through each speech and camera, I moved onto my introduction. My introduction started off as me saying "Social media is the most addictive drug" then moved onto my speech of introducing myself and what I'll be speaking on throughout the podcast, and introducing my guest. Right after that first phrase I wanted to do an intro with small clips from the whole take with music over them. To do this, I asked Dan to show me how to start as I've never done something like this before. Dan told me to go through my video and write down the times of the videos that I wanted to snip. I chose the times: 01:14:20-01:17:07, the second was 11:14:20-12:01:14, the third was 16:44:07-16:46:24, forth 17:34:07-17:36:23, the fifth was 23:04:19-23:47:02, the sixth and final clip was 50:30:07-50:34:13. I worked out the time that each clip was and then added them all up, I got a total of 24 seconds, This way I rounded it up to thirty seconds and moved my production back using the second consor down. This is called the track select foward tool. after finding my space, I created a new section by pressing file and new sequence, this was I started a new edititng format and labed it podcast intro music, I put my music on the end so I know which part of the intro I was edititng. Here is where I started my intro edititng, first I edited all the clips I wanted but I used the main source to have the video of my podcast, every point of my clips I clicked I for input purple circle, then the end of the clip I wanted I put O for output green circle; by doing this it copied the clip I wanted, then I clicked the input button which I circled in pink. After running through each slide adding them up I found the music that I wrote about in my research and added it from after my first sentence. I used the enhance button to bring out the speech more and toned down the music volume. This was you can still hear what's happening and what's being said without the music overlapping too much. There was one point where my guest spoke in the second clip of my intro where she sounded really quiet, I adjusted the clip volume and enhanced it until I found the suitable pitch. After that I copied my take and pasted it into a new sequence which I wrote "final video," after doing that I edited the first bit of the podcast to clip it into the same as the edited into. By doing this I copied it into the new video linking them together. I did this so that my videos were in sync and all levelled up. The next stage I did was go onto my podcast editing original slide and edit out the part where we watch the video from Jonathan Haidt, the way I did this was to upload that YouTube video onto my project and find the clip that I took; luckily I wrote down on my script before hand where this video started. I then edited that and added it to my podcast but further on. when I found that clip and edited the audio, I then added that to where we watched the video, I unsyinced the audio from my podcast and replaced it with the video sound. After that I placed the youtube video to the top of my parts making that the video on the top. I then went onto the effect controls and played around with the positon and scales until the youtube video was in the corner. By doing this it gives the effect of the audeince watching us watch the video, but they can also see the video at the same time. Dan and I spoke about brining in the video slightly later than what it's played so it draws the audience into the video and can understand that we are watching it.
This is a photo of what the position looks like at the end. Overall I was very happy
with my editing. I would probably change the camera zoom at the start to a fade
if I really don't like it but other than me losing my videos and not having an audio
it all worked out well. I was happy with my end result of the editing process. Next
project I will make sure everything is recording, then I will try not to cut out half
the intro. To resolve that issue I will memorise my introduction so I don't keep
having to look down.
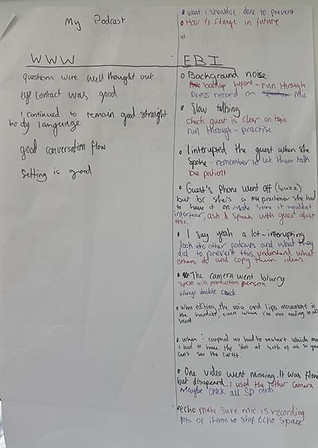
I made a list of the things I liked and disliked about my production.
What I liked: I felt I came out with good questions that were all thought through.
eye contact by me was great throughout, I had some moments of looking at the
camera or the eye contact being lost for a second but overall I kept it formal and
good.
My body language was professional, I was sitting up straight and didn't slouch
back, that would be bad because it would make the audience not take it seriously and
feel this is just something to mess around with.
Even though the conversation was slow at first, we remained a good conversation flow throughout.
The last thing I enjoyed about my podcast was the setting, I'm so pleased with how it all came out and I do believe this is my best set up. Everything was well put through and came out really well.
The next thing I did was write down what I can do better for next time/ the things I didn't like.
The first thing was about the background noise, this was bad because I didn't record the sound by mistake, to change this for next time I will do a backup run so I'm comfortable with everything, and I will make sure I'm recording before I start so I can double check.
The next thing is about the start of the podcast where we was talking slowly, this got better throughout the project but was quite bad at the start. To overcome this I will do a practice run so were already prepared, I will also make sure my guest is clear on the topic and what we will be speaking about.
The next thing is about the fact I kept interrupting my guest, this was annoying to listen back too and I fear I do it a lot. In future I will remember to let my guest talk and finish, I will be patient and give a second gap in between each person that talks.
Next is when the guests phone went off. (Buzz) because my guest was a therapist there wasn't a way she could fully turn it off in case of an emergency, to overcome this I will make sure it wont interfere, put it further away, I will also speak with my guest about the possibilities of this happening.
The camera facing me went blurry at one point for no reason, I will speak with my production crew in future and always double check everything is clear.
The next issue I had was the idea that the video disappeared, in future I will use other cameras and check all the SD cards before and after straight away to make sure everything is saved and there.
The last issue I had was the echo, this was annoying but I will make sure the mic is recording and I will fill up the room with lots of items for a less chance of space making it less echo.